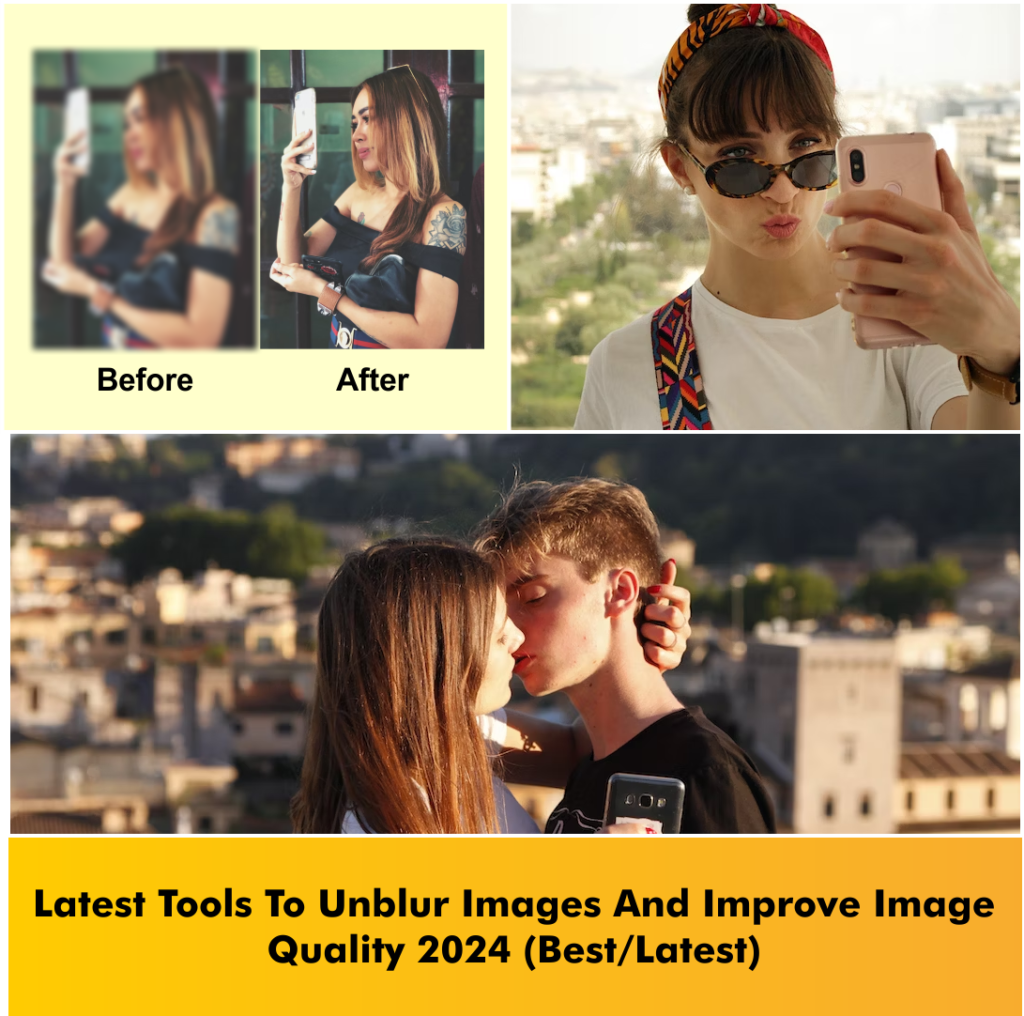
There are several tools and software available that can help you unblur images and improve photo quality. Here are a few popular options:
1. Adobe Photoshop
Adobe Photoshop is a professional image editing software that offers various tools and filters to enhance image quality, including options to reduce blur and sharpen images.Remember, while Photoshop can improve the sharpness and reduce the appearance of blur, it cannot completely restore a severely blurred or out-of-focus image. The quality of the original image plays a significant role in the results you can achieve with these techniques.
- Smart Sharpen: The Smart Sharpen filter in Photoshop allows you to sharpen images by adjusting the sharpness and reducing blur. You can find this filter under the “Filter” menu. Experiment with the Amount, Radius, and Noise Reduction sliders to find the optimal settings for your image.
- Shake Reduction: If the blur in your image is caused by camera shake, you can use the Shake Reduction filter. It analyzes the motion path of the camera during the exposure and attempts to restore sharpness. You can access this filter under the “Filter” menu > “Sharpen” > “Shake Reduction.”
- High Pass Filter: The High Pass filter is another technique to enhance image sharpness. Duplicate your image layer, apply the High Pass filter (found under the “Filter” menu > “Other” > “High Pass”), and adjust the radius to bring out the details. Then change the blending mode of the duplicate layer to “Overlay” or “Soft Light” to blend the sharpened layer with the original image.
- Unsharp Mask: The Unsharp Mask filter is a popular method for sharpening images. It enhances the edges and contrast to make the image appear sharper. You can access it under the “Filter” menu > “Sharpen” > “Unsharp Mask.” Adjust the Amount, Radius, and Threshold sliders to achieve the desired level of sharpness.
- Camera Shake Reduction: In some versions of Photoshop, there is a dedicated Camera Shake Reduction feature available under the “Filter” menu. It uses advanced algorithms to automatically analyze and correct blur caused by camera shake. This feature works best on images with slight to moderate blurring due to camera movement.
Remember, while Photoshop can improve the sharpness and reduce the appearance of blur, it cannot completely restore a severely blurred or out-of-focus image. The quality of the original image plays a significant role in the results you can achieve with these techniques.
2. GIMP
GIMP (GNU Image Manipulation Program) is a free and open-source image editing software that can be used to unblur images and enhance their overall quality. Here are some methods you can use in GIMP to try and unblur images:
- Sharpen Filter: GIMP offers a Sharpen filter that can help improve the sharpness of an image. To access it, go to “Filters” > “Enhance” > “Sharpen.” Adjust the settings to find the optimal level of sharpening for your image.
- High Pass Filter: The High Pass filter can be used to enhance details and improve sharpness. Duplicate your image layer, apply the High Pass filter from the “Filters” menu, and adjust the radius to emphasize the edges. Change the blending mode of the duplicate layer to “Overlay” or “Soft Light” to blend it with the original image and enhance the sharpness.
- Unsharp Mask: GIMP also provides an Unsharp Mask filter that can help sharpen images. You can find it under the “Filters” menu > “Enhance” > “Unsharp Mask.” Adjust the Amount, Radius, and Threshold sliders to control the level of sharpening.
- Deconvolution Plugin: GIMP has a Deconvolution plugin called Resynthesizer, which is useful for reducing motion blur or out-of-focus blur in images. This plugin is not available by default in GIMP and needs to be installed separately. It allows you to deblur images using a process called deconvolution.
- Wavelet Decompose: The Wavelet Decompose plugin in GIMP is useful for decomposing an image into different frequency layers. By manipulating these layers, you can enhance the details and reduce blur. This method requires some experimentation and understanding of wavelet decomposition.
Remember that these techniques in GIMP, like in any image editing software, have their limitations. They can help improve the sharpness to some extent, but they may not fully restore severely blurred or low-resolution images. Additionally, the quality of the original image will impact the results. It’s always best to start with the highest quality image available for better outcomes.
3. Focus Magic
Focus Magic is a dedicated software designed specifically for unblurring images and reducing motion blur or out-of-focus blur. It uses advanced algorithms to analyze the image and attempt to restore sharpness and clarity. Here’s how you can use Focus Magic to unblur images:
- Open the Image: Launch Focus Magic and open the blurred image you want to work on. You can either use the “Open” option from the File menu or drag and drop the image into the software.
- Choose the Blur Type: Focus Magic provides options for different types of blur, such as motion blur, out-of-focus blur, or a combination of both. Select the appropriate blur type that matches the issue in your image.
- Adjust the Blur Estimation: Focus Magic includes a Blur Estimation tool that helps estimate the blur parameters in the image. Use the sliders or input fields to adjust the blur estimation until you get the best possible result. This step is crucial for accurate unblurring.
- Apply the Corrections: Once you have set the blur estimation, click on the “Preview” button to see the result. If you are satisfied, click on the “Apply” or “OK” button to apply the corrections to the image. Depending on the complexity of the blur, it may take some time to process.
- Fine-tune the Settings: Focus Magic provides additional settings to refine the unblurring process. You can adjust the sharpening strength, select the noise reduction level, and tweak other parameters to achieve the desired outcome. Experiment with these settings to get the best results.
- Save the Result: After applying the corrections and fine-tuning the settings, save the unblurred image using the “Save” or “Export” option in Focus Magic. Choose the desired file format and location to save the final image.
Focus Magic is known for its ability to restore sharpness and reduce blur in images, especially for photos affected by camera shake or out-of-focus issues. However, keep in mind that while it can significantly improve image quality, it may not be able to fully restore severely blurred or low-resolution images. It’s always best to work with the highest quality image available for better results.
4. SmartDeblur
SmartDeblur is a specialized software designed to unblur images and reduce the effects of motion blur, out-of-focus blur, and Gaussian blur. It uses advanced deconvolution algorithms to analyze the blur in the image and attempt to restore the sharpness and clarity. Here’s how you can use SmartDeblur to unblur images:
- Open the Image: Launch SmartDeblur and open the blurred image you want to work on. You can either use the “Open” option from the File menu or drag and drop the image into the software.
- Adjust Blur Parameters: SmartDeblur provides several options to adjust the blur parameters for different types of blur. Select the appropriate blur type that matches the issue in your image, such as motion blur, out-of-focus blur, or Gaussian blur.
- Apply the Deblur Process: Once you have selected the blur type, click on the “Analyze” or “Deblur” button to start the deblurring process. SmartDeblur will analyze the blur in the image and attempt to restore the sharpness.
- Refine the Result: After the deblurring process is complete, you will see the result on the screen. SmartDeblur provides options to fine-tune the settings and adjust the amount of sharpening, smoothness, and grain suppression. Experiment with these settings to achieve the desired outcome.
- Save the Result: Once you are satisfied with the result, save the unblurred image using the “Save” or “Export” option in SmartDeblur. Choose the desired file format and location to save the final image.
SmartDeblur is a powerful tool for reducing blur and restoring sharpness in images. However, it’s important to note that the success of the deblurring process depends on various factors, including the severity and type of blur, image quality, and the accuracy of the blur analysis. While SmartDeblur can significantly improve image quality, it may not be able to fully restore severely blurred or low-resolution images. It’s always best to work with the highest quality image available for better results.
5. Fotor
Fotor is an online photo editing tool that offers a range of features, including options to enhance image quality and reduce blur. While Fotor provides some basic tools for sharpening and improving image clarity, it may not have advanced capabilities specifically dedicated to unblurring images like specialized software such as Focus Magic or SmartDeblur. However, here’s how you can use Fotor to try and reduce blur in your images:
- Open the Image: Go to the Fotor website (www.fotor.com) and click on the “Edit a Photo” button. Upload the blurred image you want to work on.
- Sharpen Tool: Fotor provides a Sharpen tool that can help improve image clarity and reduce the appearance of blur. Select the “Sharpen” tool from the editing toolbar, and then adjust the strength or intensity of the sharpening effect using the slider. Apply the changes and observe the result.
- Clarity Tool: Fotor also offers a Clarity tool that can enhance details and improve overall image quality. This tool can sometimes help reduce the perception of blur in the image. Select the “Clarity” tool from the editing toolbar, adjust the strength, and apply the changes to see if it helps improve the sharpness.
- Compare and Fine-tune: After applying the sharpening or clarity adjustments, compare the edited image with the original to evaluate the improvement. If needed, you can further fine-tune the settings to achieve the desired outcome.
- Save the Result: Once you are satisfied with the edits, click on the “Save” or “Export” button to download the edited image to your computer.
While Fotor can help enhance image quality to some extent, it’s important to note that its capabilities for reducing blur are limited compared to specialized software. If you have severely blurred or out-of-focus images, you may achieve better results by using dedicated tools like Focus Magic or SmartDeblur.
6. Topaz Sharpen AI
Topaz Sharpen AI is an advanced software specifically designed to sharpen images and reduce blur caused by various factors such as camera shake, focus issues, or motion blur. It utilizes AI-powered algorithms to analyze and enhance image details for improved clarity and sharpness. Here’s how you can use Topaz Sharpen AI to unblur images:
- Open the Image: Launch Topaz Sharpen AI and open the blurred image you want to work on. You can either use the “Open” option from the File menu or drag and drop the image into the software.
- Select the Sharpening Mode: Topaz Sharpen AI offers three different sharpening modes: Sharpen, Stabilize, and Focus. Choose the appropriate mode based on the type of blur in your image. The Sharpen mode is generally suitable for general sharpening, the Stabilize mode helps reduce motion blur and camera shake, and the Focus mode addresses out-of-focus blur.
- Adjust the Sharpening Settings: Topaz Sharpen AI provides various sliders and options to fine-tune the sharpening process. These include options for adjusting the amount of sharpening, removing noise, and handling artifacts. Experiment with the settings to achieve the desired level of sharpness and clarity.
- Preview and Refine: After adjusting the settings, click on the “Preview” button to see a side-by-side comparison of the original and sharpened image. Analyze the results and make further adjustments if necessary to refine the output.
- Apply the Sharpening: Once you are satisfied with the previewed result, click on the “Apply” or “OK” button to apply the sharpening to the image. Depending on the complexity of the blur and the size of the image, the processing time may vary.
- Save the Result: After applying the sharpening, save the unblurred image using the “Save” or “Export” option in Topaz Sharpen AI. Choose the desired file format and location to save the final image.
Topaz Sharpen AI is known for its advanced AI algorithms and its effectiveness in reducing blur and enhancing image sharpness. It can produce significant improvements in image quality, especially in cases of camera shake or focus issues. However, it’s important to note that while Sharpen AI can deliver impressive results, it may not be able to fully restore severely blurred or low-resolution images. It’s always best to work with the highest quality image available for better outcomes.
7. Astra Image
Astra Image is an image processing software that offers a range of tools and features for enhancing and improving image quality, including options for reducing blur and enhancing sharpness. While Astra Image is not specifically dedicated to unblurring images like some other specialized software, it provides various filters and algorithms that can help improve image clarity. Here’s how you can use Astra Image to reduce blur in your images:
- Open the Image: Launch Astra Image and open the blurred image you want to work on. You can typically open an image by selecting the “File” menu and choosing the “Open” option, or by using the keyboard shortcut (Ctrl+O or Command+O).
- Apply Sharpening Filters: Astra Image provides several sharpening filters that can help enhance image details and reduce blur. Explore the available sharpening filters or options, such as “Unsharp Mask,” “Contrast Enhancement,” or “Edge Enhancement.” Apply these filters and adjust their settings to achieve the desired level of sharpening.
- Deconvolution: Astra Image also offers deconvolution algorithms to address blur caused by factors like motion blur or out-of-focus issues. Deconvolution attempts to restore lost details by reversing the blur process. Look for deconvolution options or filters within Astra Image and experiment with them to reduce the blur in your image.
- Fine-tune the Settings: After applying sharpening or deconvolution filters, fine-tune the settings to achieve the best result. Adjust parameters such as sharpening strength, radius, or deconvolution settings to optimize the image sharpness and clarity.
- Preview and Compare: Use the preview functionality within Astra Image to compare the edited image with the original. This allows you to evaluate the impact of the applied filters and make further adjustments if necessary.
- Save the Result: Once you are satisfied with the edits, save the unblurred image using the “Save” or “Export” option provided by Astra Image. Choose the desired file format and location to save the final image.
While Astra Image offers various tools and filters to enhance image quality, it’s important to note that its capabilities for reducing blur may not be as specialized as dedicated software like Focus Magic or SmartDeblur. For severely blurred or challenging cases, using dedicated unblurring software might yield better results.
When using these tools, keep in mind that while they can help improve photo quality to some extent, they may not be able to fully restore severely blurred or low-resolution images. It’s always best to start with the highest quality image available to achieve better results.